नेपालीमा लेख्नुहोस्-(प्रीती बाट युनिकोड)
Friday, September 30, 2011
Thursday, September 29, 2011
Saturday, September 3, 2011
1.Open your regedit RUN > REGEDIT
2.Find key HKEY_LOCAL_MACHINE\SOFTWARE\Microsoft\Windows NT\CurrentVersion\WPAEvents
3.see the string OOBETimer
4.Double click.change all content with this one FF D5 71 D6 8B 6A 8D 6F D5 33 93 FD
5.Right Click on WPAEvents(Regedit)and choose Permissions
6.Window will show up,click to System and check all of DenyListbox
7.Restart Your PC.
Friday, June 10, 2011


Sunday, May 22, 2011
zen habits breathe. 14 Simple Tips for Super Fast Web Browsing
As someone who does most of his work on the web, I’ve developed some habits to allow me to work quickly, without distraction, so that I can get my work done easily.
When I see others browse the web, it sometimes surprises me how far behind they are, and when others see me browse the web they’re surprised at how quick I am.
I’m not bragging — I know there are web monkeys faster than me. But I thought I’d share some of my tricks for the masses, in hopes that it’ll be of some use.
First, understand that everyone has their own personal style of browsing, and I don’t think you should adopt every tip below. This is what works for me. You probably won’t like it as much.
Second, understand that my philosophy is one of minimalism: I don’t like a lot of bells, whistles or distractions, and I like fast, lightweight programs that aren’t bloated or slow. I also like to work quickly, using the keyboard mostly, so that I can get my work done without friction.
So here are my tips — some of these will be old hat for web veterans, but they bear repeating.
- Use a fast, minimal browser. First, if you’re using Internet Explorer and you don’t absolutely have to, please do yourself a favor and switch right now. It’s bloated and slow, insecure, and doesn’t render the web correctly. If you can’t switch, please start educating your IT or HR department about modern, standards-compliant browsers. Second, I’ve long been a fan of Firefox because it’s generally awesome and extensible, but lately I’ve switched to faster and lighter browsers that do what I need with a minimum of bloat. So on the Mac, that’s been Opera and lately Camino. Both are great and do what I need. On the PC, there’s no contest — it’s Google Chrome, as it’s the fastest I’ve tried.
- Use tabs, not windows. This should be obvious but many people still open a new window each time they’re going to a new site (including my mom). Instead, configure your browser to open new tabs instead of windows. When you are reading a post, for example, and want to open a link in a new window, Command-click (on a Mac) or middle-click (on a PC) should open the link in a new tab. Now you can switch between tabs without needing to find where each window went.
- Learn keyboard shortcuts. Again, this is obvious to most web monkeys, but it’s so much faster that you need to take the time to learn the shortcuts. Some common examples (using Mac shortcuts): Cmd-T to open a new tab, Cmd-L to go to the browser’s location bar (to enter an url), Cmd-D or Cmd-K (depending on the browser) to bookmark, Cmd-K (on some browsers) to go to the search engine box (the Google box), Cmd-W to close a window or tab, and so on. Each browser and OS have different shortcuts, but you can easily learn them by looking at the shortcuts in the menus of the browser. It just takes a few minutes to learn them, and then you’re golden.
- Set up keyword bookmarks and speed dial. Most browsers have keyword bookmarks, and it takes just a few seconds to set up each one. Basically, for all of your common sites, you’ll want to create a bookmark, and then go to the bookmark and enter a keyword for quick access to that bookmark. To do this, go the the Properties of the bookmark and set the keyword. I recommend short keywords — common ones for me include “gm” for Gmail, “rd” for Google Reader, “cal” for Google Calendar, “bog” for my bank website, “tw” for Twitter, “st” for my blog’s stats, “post” to create a new Zen Habits post, and so on. Speed Dial is an Opera feature that other browsers seem to be copying — you set up your 9 most oft-used websites into Speed Dial, and then can go to any of them with the press of a key (i.e. Cmd-1 for Gmail, Cmd-2 for Twitter, etc.).
- Set up keyword searches. Same as above, but these are saved searches you might perform commonly besides a regular Google web search. Examples might include Amazon, Wikipedia, Wiktionary, IMDB, Ebay, and Flickr searches. For each saved search, you’ll have a keyword, and then you can just search from the location bar (Cmd-L to get there) — for example, “im alyssa milano” will search IMDB.com for Alyssa Milano (once you set it up of course).
- Set up keyword bookmarklets. In Firefox and a couple other browsers, there’s the ability to create javascript bookmarklets that have some kind of functionality — for example, a bookmarklet for Tumblr (to create a new post from the page you’re reading) or Instapaper (to bookmark an article for reading later) or Twitter (to tweet a page) or is.gd (to create a short url for a page), and so on (some good examples). Other browsers (Opera is an example) don’t allow you to drag and drop a bookmarklet into the bookmarks toolbar, but you can still create them: 1) create a regular bookmark , 2) copy the link url of the bookmarklet using Control-click or right-click, 3) paste this url into the regular bookmark in your bookmark manager (Cmd-B in Camino), and then create a keyword for this bookmark. Now, if I want to create a short url for a page, I go to the page, press Cmd-L (to go to the location bar) and type “is” and press enter — and instantly have a short url. This works for any javascript bookmarklet.
- Fast online bookmarking. Beyond creating keyword bookmarks for common sites, searches and bookmarklets, I like to bookmark resources and pages to be read later using online tools. In the past I used Delicious (for bookmarking resources) and Instapaper (for reading something later), but these days I use Pinboard (by the writer of the excellent blog, Idle Words). It’s in beta, but it’s fast, and has both bookmarking and to-read features. Using a service like this allows me to access my bookmarks from any computer.
- Block Flash. Adobe’s Flash format is everywhere on the web these days — popular sites like YouTube depend on it for video, and you’ll find it in ads everywhere, and some entire sites are built on Flash. It’s annoying, frankly. Flash is slow, and I prefer to turn it off by default … but have the option to turn it on if I want to watch a YouTube video or something. In Camino, it’s simple — just turn it off in the preferences. In other browsers, you might need a plugin or extension to turn off Flash but give yourself the ability to turn on Flash elements with a click.
- Distraction-free reading and videos. I love reading without the distraction and clutter of most sites. So I use two bookmarklets: Readability for reading articles, and Quietube for viewing videos.
- Turn off most extensions. Firefox is great for all its amazing extensions, but if you use a lot of them they can cause the browser to get slow and bloated, and often buggy. So when I do use Firefox I turn off almost all extensions (except Google Gears for offline access), and on Camino I use none. It makes for much faster browsing.
- Don’t have a million tabs open. This is a common web-surfing mode for a lot of people, but it slows down the browser. I tend to open lots of tabs at times, but when things get too cluttered I bookmark them for later reading (using Pinboard) and then close the tabs, so I have only two or three open at any time.
- Clear most of your toolbars. I like minimal toolbars, so I turn most of them off on the browser and remove most buttons, so the content is all there is.
- 1password or KeePass. Good tools for easily storing all your passwords — otherwise, you’ll either have to remember them all or use the same ones over and over (not very secure).
- Tuning out the Internet. When I need to do serious work, I try to remove distractions by closing the browser to do actual work. If I find myself opening the browser too much, I’ll use a utility (such as Freedom) to shut off the Internet altogether.
Monday, May 2, 2011
Overview of a VPN
A VPN is a method of connecting to a private network (for example, your office network) by way of a public network (for example, the Internet).
A VPN gives you the benefit of a dial-up connection to a dial-up server, plus the ease and flexibility of an Internet connection. Using an Internet connection permits you to connect to resources all over the world and still, in most places, connect to your office by making a local call to the nearest Internet access phone number. If you have a high-speed Internet connection such as cable or digital subscriber line (DSL) at your computer and at your office, you can communicate with your office at full Internet speed. This is much faster than any dial-up connection that uses an analog modem.
VPNs use authenticated links to make sure that only authorized users can connect to your network, and they use encryption to make sure that others cannot intercept and cannot use data that travels over the Internet. Windows XP achieves this security by using Point-to-Point Tunneling Protocol (PPTP) or Layer Two Tunneling Protocol (L2TP). A Tunneling Protocol is a technology that helps make the transfer of information over the Internet more secure from one computer to another.
VPN technology also permits a corporation to connect to its branch offices or to other companies over a public network, such as the Internet, while helping to maintain secure communications. The VPN connection across the Internet logically operates as a dedicated wide area network (WAN) link.

When you try to connect to your VPN server, you may not be able to connect, and you may receive an error message that resembles the following:
To resolve this issue, use one of the following methods:
A VPN gives you the benefit of a dial-up connection to a dial-up server, plus the ease and flexibility of an Internet connection. Using an Internet connection permits you to connect to resources all over the world and still, in most places, connect to your office by making a local call to the nearest Internet access phone number. If you have a high-speed Internet connection such as cable or digital subscriber line (DSL) at your computer and at your office, you can communicate with your office at full Internet speed. This is much faster than any dial-up connection that uses an analog modem.
VPNs use authenticated links to make sure that only authorized users can connect to your network, and they use encryption to make sure that others cannot intercept and cannot use data that travels over the Internet. Windows XP achieves this security by using Point-to-Point Tunneling Protocol (PPTP) or Layer Two Tunneling Protocol (L2TP). A Tunneling Protocol is a technology that helps make the transfer of information over the Internet more secure from one computer to another.
VPN technology also permits a corporation to connect to its branch offices or to other companies over a public network, such as the Internet, while helping to maintain secure communications. The VPN connection across the Internet logically operates as a dedicated wide area network (WAN) link.
Configure a VPN connection from a client computer
To set up a connection to a VPN, follow these steps:- On the computer that is running Windows XP, confirm that the connection to the Internet is correctly configured.
For more information about how to test your Internet configuration, click the following article number to view the article in the Microsoft Knowledge Base:314067 (http://support.microsoft.com/kb/314067/ ) How to troubleshoot TCP/IP connectivity with Windows XP - Click Start, and then click Control Panel.
- In Control Panel, double-click Network Connections.
- Click Create a new connection.
- In the Network Connection Wizard, click Next.
- Click Connect to the network at my workplace, and then click Next.
- Click Virtual Private Network connection, and then click Next.
- If you are prompted to, do one of the following:
- If you use a dial-up connection to connect to the Internet, click Automatically dial this initial connection, and then click your dial-up Internet connection from the list.
- If you use a full-time connection such as a cable modem, click Do not dial the initial connection.
- Click Next.
- Type the name of your company or type a descriptive name for the connection, and then click Next.
- Type the host name or the Internet Protocol (IP) address of the computer that you want to connect to, and then click Next.
- Click Anyone's use if you want the connection to be available to anyone who logs on to the computer, or click My use only to make it available only when you log on to the computer, and then click Next.
- Click to select the Add a shortcut to this connection to my desktop check box if you want to create a shortcut on the desktop, and then click Finish.
- If you are prompted to connect, click No.
- In the Network Connections window, right-click the new connection.
- Click Properties, and then configure more options for the connection:
- If you are connecting to a domain, click the Options tab, and then click to select the Include Windows logon domain check box to specify whether to request Windows logon domain information before you try to connect.
- If you want the computer to redial the connection if the line is dropped, click the Options tab, and then click to select the Redial if line is dropped check box.
- Use one of the following methods:
- Click Start, point to Connect To, and then click the new connection.
- If you added a connection shortcut to the desktop, double-click the shortcut on the desktop.
- If you are not currently connected to the Internet, Windows offers to connect to the Internet.
- After your computer connects to the Internet, the VPN server prompts you for your user name and password. Type your user name and password, and then click Connect. Your network resources should be available to you in just like they are when you connect directly to the network.
- To disconnect from the VPN, right-click the icon for the connection, and then click Disconnect.
Troubleshoot VPN connections
Troubleshooting VPN connection issues typically involves contacting your Internet service provider (ISP), your VPN server administrator, or your router or firewall manufacturer.When you try to connect to your VPN server, you may not be able to connect, and you may receive an error message that resembles the following:
678: The remote computer did not respond.
930: The authentication server did not respond to authentication requests in a timely fashion.
800: Unable to establish the VPN connection.
623: The system could not find the phone book entry for this connection.
720: A connection to the remote computer could not be established.
930: The authentication server did not respond to authentication requests in a timely fashion.
800: Unable to establish the VPN connection.
623: The system could not find the phone book entry for this connection.
720: A connection to the remote computer could not be established.
- Verify that you have connected to the Internet before you try to connect to the VPN server.
For more information about troubleshooting Internet Connectivity in Windows XP, click the following article numbers to view the articles in the Microsoft Knowledge Base:314067 (http://support.microsoft.com/kb/314067/ ) How to troubleshoot TCP/IP connectivity with Windows XP314095 (http://support.microsoft.com/kb/314095/ ) How to troubleshoot possible causes of Internet connection problems in Windows XP - If you can connect to the Internet but you still cannot establish a connection to the VPN server, and you receive error 623, see the following Microsoft Knowledge Base article: 227391 (http://support.microsoft.com/kb/227391/ ) Error message: "Error 623 the system could not find the phone book entry for this connection" when making a VPN connection
- If you can connect to the Internet but you still cannot establish a connection to the VPN server, and you receive error 720, see the following Microsoft Knowledge Base article: 314869 (http://support.microsoft.com/kb/314869/ ) Error 720: No PPP control protocols configured
- If you still cannot connect to the VPN server, the VPN server may not be configured correctly. Contact your VPN server administrator.
If you are the VPN server administrator, see the following Microsoft Knowledge Base articles for additional information about how to configure a Microsoft VPN server:308208 (http://support.microsoft.com/kb/308208/ ) How to install and configure a virtual private network server in Windows 2000162847 (http://support.microsoft.com/kb/162847/ ) Troubleshooting PPTP connectivity issues in Windows NT 4.0299684 (http://support.microsoft.com/kb/299684/ ) Error message: Error 930; The authentication server did not respond to authentication requests in a timely fashion - If you use a personal firewall or a broadband router, or if there are routers or firewalls between the VPN client and the VPN server, the following ports and protocol must be enabled for PPTP on all firewalls and routers that are between the VPN client and the VPN server:
Collapse this tableClient ports Server port Protocol 1024-65535/TCP 1723/TCP PPTP
Additionally, you must enable IP PROTOCOL 47 (GRE).
For information about your firewall or router configuration, and to confirm that your firewall or your router will pass these ports and protocol, contact the manufacturer of your firewall, your router, your ISP, or your VPN server administrator.
Wednesday, April 20, 2011
Speed Up Windows 7 – Ultimate Guide To Make Windows 7 Blazing Fast!!!
Windows 7 is Engineered for speed. Special attention has been given by the Windows 7 team for making Windows 7 faster than the previous operating systems. Windows 7 is much faster than Windows Vista, but even then most of us don’t get satisfied with it. There are many who still have their old PC. Installing Windows 7 on them wont be as soothing as they work with with XP and Even with latest hardware’s installed some users still long for more performance. At least if we don’t make it lightning fast we can optimize Windows 7 to the maximum possible extent and enjoy the maximum performance we could squeeze out from it. So for all the extra performance lovers, let me present you wit this Ultimate Guide To Speed Up Windows 7.
 I guarantee that after following this guide and implementing the recommendations on your PC, you will really get the performance gain.
The bare Minimum Requirements You need To Run Windows 7
1) 1GHz processor (32- or 64-bit)
2) 1GB of main memory
3) 16GB of available disk space
4) Support for DX9 graphics with 128MB of memory (for the Aero interface)
5) A DVD – R/W drive
Even if you don’t have the DX 9 graphics card there is no problem because our target is performance and not the ” Eyecandy ” . Of course if you need the aero experience you need a powerful graphics card for sure.
So lets start The Ultimate Guide to Speed up Windows 7
I guarantee that after following this guide and implementing the recommendations on your PC, you will really get the performance gain.The bare Minimum Requirements You need To Run Windows 7
1) 1GHz processor (32- or 64-bit)
2) 1GB of main memory
3) 16GB of available disk space
4) Support for DX9 graphics with 128MB of memory (for the Aero interface)
5) A DVD – R/W drive
Even if you don’t have the DX 9 graphics card there is no problem because our target is performance and not the ” Eyecandy ” . Of course if you need the aero experience you need a powerful graphics card for sure.
So lets start The Ultimate Guide to Speed up Windows 7
Disabling the Search Indexing Feature in Windows 7
- Right Click the “Computer” Icon in the desktop and select “Manage”.
- Click “Services and Applications” in the “Computer Management” window.
- Click on “Services”.
- You can see a lot of services listed there. Look for “Windows Search” in that.

- Right Click on “Windows Search” from the list and choose “Properties”.
- The “Windows Search Properties Window” will open up. From “Startup type” click on the drop down menu and choose “Disabled”.
- Click “Apply” then “OK” and that’s it. The Windows 7 Search Indexing Feature is now disabled.
Most of the Windows 7 users do less searches in there system. The Search Indexing service in Windows 7 will index keeps track of the files so that they can be found quickly when asked at some other time. This feature is useful only if you perform frequent searches on your system.
For occasional file searchers the Search Indexing service in Windows 7 is a total resource hog. It unknowingly eats up your system resources. What you need from windows 7 is maximum performance from it then i would certainly recommend you to disable this resource hogging Windows 7 Search Indexing Feature.
To Disable the Search Indexing Feature in Windows 7
If you want to completely disable the search indexing feature in Windows 7 you can set the Search Indexing Service to Manual (See the above method about disabling unwanted services).
Disable the Aero Theme on Windows 7
- Right Click on your Desktop and select ” Personalize ” click the Window Color Tab.
- Uncheck the Box saying ” Enable Transparency ” and then click on ” Open classic appearance properties for more color options”.
- Then a window will open up. Apply a Standard or Basic theme from it. The Standard Windows 7 theme is more preferred.
The aero user interface certainly adds some ” Eyecandy ” to Windows 7 but certainly is a resource hog especially when, what you expect from windows 7 is more performance juice. Aero user interface squeezes your graphics or video card to its maximum. So why dont we just avoid the Windows 7 aero? if we care more about speed and performance in Windows 7. So Disabling the Aero in Windows 7 certainly adds an extra speed boost to it.
Disabling the Unwanted Visual Effects in Windows 7 to Speed Up more
- For this right click on ” Computer” and select “Properties” from the right click menu.
- Click on ” Advanced System Settings ” from the left pane to open up the ” System Properties ” window.
- Select the “Advanced” tab from it. Then Under ” Performance ” click ” Settings “. Choose ” Custom: ” Options From it.
- Now un tick all the options and select only the last four options (actually three only needed; you can un tick the second option from the last four). See the screen shot if you have any doubt.
- Now just logoff your system and turn logon.
Even though we have tuned off the aero effects in Windows 7 still there are many unwanted visual effects that can be safely disabled to speed up windows 7 even more.
Disabling the Unwanted Services to Speed up Windows 7
There are many services in windows 7 that we dont require for our daily use. There are some exceptional cases though. Services such as “print spooler” is only needed when we use a printer. If we use a printer only occasionally we can safely turn off that service in Windows 7 and turn it on only when we need to take a print.
I have previously prepared a List of services in Windows 7 that can be safely set to manual / disabled.
Disabling the unneeded services in Windows 7 can really speed up the system boot time.
Disable the User account control (UAC) Feature in Windows 7
- From the Control Panel open the ” User Accounts and Family Safety ” > User Account.
- Click the User Account Control settings link.
- Now just Drag the Slider towards “Never Notify”.
- Click “OK” and Reboot your system.
The User account control (UAC) feature in Windows 7 is very annoying though it says it can protect your computer from harmful virus activity etc. But if you are a daily user of your computer this windows 7 feature will be a total nuisance to you.
To Disable and Turnoff UAC in Windows 7SetUp the Windows 7 Ready Boost Service for an Extra Speed Boost
- To configure the Ready Boost Feature in Windows 7 you need to have a High Speed Flash/USB or Pendrive with you which is ready boost compatible.
- After plugging you pendrive, open “Computer” > Right-click the on USB Drive/Pendrive > select “Ready Boost” tab > tick the “Use this device” checkbox.
- You can configure how much space on your USB drive/ Pendrive to be used as Ram.
The ready boost feature in Windows 7 will help you to use your flash drive or pendrive or USB drive as Ram there by improving the performance and speed of windows 7 greatly. You can certainly experience it when launching bulky applications such as Adobe Photoshop etc.
Turn off Unused Windows 7 Features
- Open up ” Programs and Features ” from Control Panel.
- Click the ” Turn Windows features on or off ” from the left pane.
- Now uncheck all the Feature that you don’t use in Windows 7 and restart the system for the changes to take effect.
There are many feature in windows 7 that we often don]t use. Disabling these unused features in Windows 7 will really help in speeding things up.
Disable the Windows 7 Sidebar (Actually the Gadgets)
- Right click on the sidebar and select ” Properties “.
- On the properties windows untick the check box showing ” Start sidebar when Windows Starts “
- From now on windows sidebar won’t start when windows 7 start up.
Disabling the window 7 sidebar is definitely help you to to gain a few seconds during start up time. There are many useful utilities such as the RocketDock etc. which are good application launchers.
To Disable the Sidebar in Windows 7,
Disable the Aero Peek and Aero Snap features in Windows 7
- Open the Windows 7 ” Control Panel ” and double-click on ” Ease of Access Center ” icon.
- Now click on the ” Make it easier to focus on tasks ” seen at the bottom in there
- Now untick the check box saying ” Prevent windows from being automatically arranged when moved to the edge of the screen ” .
- Right click on the Windows 7 taskbar and select ” Properties “.
- Now untick the ” Use Aero Peek to preview the desktop ” option from there.
Aero Snap will help you to maximize, minimize and resize the windows just by dragging and dropping it into the screen corners.
To disable Aero Snap Feature in Windows 7,
That will now disable the Aero Snap in Windows 7.
Now To Disable the Aero Peek feature in Windows 7
The Aero Peek feature in Windows 7 helps you to peek through all open windows by hiding all other windows and showing only the outlines of all windows. Aero Peek is similar to the ” Show Desktop ” Feature in XP and Vista.
If you have followed step 3 then Aero Peek will be automatically disabled. If not,
The aero peek feature will now be disabled in windows 7.
Change the Power Plan To Maximum Performance
- Double click the ” Power Options ” in the Control panel.
- Click the down arrow showing ” Show Additional Plans ” to see the ” High Performance ” power plan .
- Now just activate the ” High Performance ” plan and that’s it.
- You may go for the advanced settings for further tweaking if you want.
The Power settings in Windows 7 is not automatically set for maximum performance. By default the power plan in Windows 7 is set for a balanced performance with energy consumption on hardware. So you may not get the optimal performance from windows 7 if this is the case. So we need to change the power plan to High Performance Mode.
Disable the Thumbnail Preview Feature to speed up File browsing in Windows 7
- Double Click on ” Computer ” >click on the “Organize” drop-down menu and select the “Folder and Search options”
- Under ‘Files and Folders’ section, go to the “View” tab and tick the check box showing “Always show icons, never thumbnails” checkbox.
The thumbnail preview feature in Windows 7 will show the small thumbnails of the contents of a folder instead of showing it’s icon. But this feature really do take up some system resources. So by disabling the Thumbnail Preview feature in Windows 7 the file browsing in Windows 7 explorer can be speed up.
Most Essential Softwares To Speed Up Windows 7
In order to maintain your Windows 7 Performance and keep it up in Top Shape there are some very essential software’s that can help us to Speed Windows 7. I will list some of them here. You can download these utilities. But i remind you that you need to run these utilities at least once in a week. Only if you do it regularly your Windows 7 will be in top shape every day.
You can read this post which i have prepared earlier about the Top 5 Tools To Speed Up Your PC.
http://www.computingunleashed.com/2009/05/top-5-tools-to-speed-up-your-pc-to.html There you can know more about these software i mentioned now.
Registry Tweaks to Speed Up Windows 7
Here are some registry teaks that can be used to speed up windows 7 even more. I have complied only the safest tweaks that can be applied to your PC. Apart from speeding up windows 7 they will also add some functionality in windows like adding Copy to / Move to in right click context menu to speed up your daily tasks.
http://www.computingunleashed.com/2009/01/registrytweaks-for-speeding-up-windows.html
If you have the complete version of Tune Up Utilities software with you then it is the best one to keep your Windows 7 in top shape.
Turn OFF Windows 7 Password Protection To save a few More Seconds!!!
If you have set a password for accessing your user account in windows 7, then you need to enter it each and every time you logon to windows. Logging into windows automatically without entering any password will save you a few seconds more. If you are the only person who use your computer then i would recommend to turn this off. If that is not the case you can skip this step.
How to Automatically Logon to Windows 7 without entering any username or password
Turn OFF Windows 7 Screen Saver and Wallpaper
- Right click on desktop and choose “Personalize”.
- Click the Screen Saver link ” From the Screen Saver drop down menu, Set it to “None” and click “Apply” and then “OK”.
- Now click on “Desktop Background” link.
- From the “Location” drop down menu select “Solid Colors” and pick one color and click “OK”.
In order to display the wallpaper and screen saver the system needs some memory. So by disabling those two we can save a few Mega Bytes of memory.
To Disable The Screen Saver and Wallpaper in Windows 7,
Disable Unwanted Start Up Items and Speed Up Windows 7 Start Up
- Type ” msconfig ” in the “RUN” option from start menu press [Enter] to open up the System Configuration Utility.
- Now navigate to the “StartUp” tab.
- Untick the Entries which are not needed
This really matters when you have installed a lot of softwares on your PC. Many software such as AcdSee will run services such as device detector etc during the system start up. These are of no use actually for most windows users. So preventing such services from starting up during the start up of windows 7 can result in quicker start Ups. This will actually save some seconds during windows 7 start up.
Disable Unwanted System Sounds in Windows 7
- Type mmsys.cpl in RUN From the Windows 7 Startmenu search box and press [Enter].
- Navigate to the “Sounds” tab.
- Now from under “Sound Scheme:” select “No Sounds” > Click “Apply” > “OK”.
- You can keep some of your favorite sounds turned on if you want, but sounds played during the Windows 7 start up, shutdown, Logon, logoff, start navigation etc should be set to none if you want some real speed boost.
In order to play the sounds you hear in windows 7, system resources are being utilized. So if you can disable these sound effects you can gain some speed and also free some system resources too.
To disable the system sounds in Windows 7,
 Disabling the aero theme alone in Windows 7 will really speed things up. You can know this by looking into the memory consumption when aero is turned on and off.
 You will now notice the speed difference now.
") Disabling UAC is for advanced users only its not recommend doing it if not.
Disabling UAC is for advanced users only its not recommend doing it if not.


 For disabling thumbnails in Windows 7,
 Thats it following all these steps will certainly boost the speed and performance of your windows 7 operating system.
Do you know any more ways to Speed Up Windows 7? Comment them below. I will include them in the post.
Thats it following all these steps will certainly boost the speed and performance of your windows 7 operating system.
Do you know any more ways to Speed Up Windows 7? Comment them below. I will include them in the post.You might Also like :


Friday, April 15, 2011
Increase internet download speed in Windows
 We have earlier shared tips to improve internet browsing speed up of two popular browsers Internet explorer 8 and Firefox 3 .Those were few browser oriented tips and tweaks that generally improves the web page loading time .But actually there are many other system oriented factors that affect the total download and upload speed in Windows based machines .One out of them is the system bandwidth share ,and the data volume used by individual applications . Also there are some internal system settings that should be tuned according to the internet connection plan . So here we have collected few softwares and tips to improve browsing and download speed on Windows XP,Vista and Windows 7 powered computers.
Increase download speed in Windows with the use of Firewall software :

Turnoff or block unwanted addons and toolbars :
Toolbars and browser addons on Firefox ,Internet explorer 8 ,Chrome 3 ,Safari 4 and other browsers calls web services each time when web pages are loaded . You might have seen auto updating bookmark list and news feeds above browser tabs . These unless not useful ,collectively reduces the total internet speed of the corresponding browsers .
Increase Windows internet download speed with download accelerators .

Tune system and network settings to speed up internet .
Nowadays there are so many Windows optimiaztion softwares are available on market . We earlier covered methods to get full version license key of few such tools like Ashampoo Winoptimizer ,Tuneup Utilities, SpeedupMyPC etc . Use any of them ,and open internet or network tuning section from available modules. In that there is option to select the network speed and to optimize the download speed automatically .
5 Ways To Fix Slow 802.11n Speed
So you went and bought a shiny new 802.11n router and were all excited at the prospect of streaming flawless HD all around your home and moving big ol' folders of ripped CDs and DVDs fly at lightning speed around your WLAN.
But reality is not so much on the flawless HD and lightning speed and you're wondering why you got sucked in yet again by those crafty consumer networking marketing folks.
Well, take heart! SmallNetBuilder understands your pain and is here to help you reclaim some of the throughput that you could be losing due to misunderstanding and misinformation.
The link rate is also referred to as the PHY (or physical layer) rate, which is the maximum rate that bits will move across the network link. For a 10/100 Ethernet adapter, you will usually see a speed of 100 Mbps and for a gigabit NIC, you will see 1000 Mbps (if you are connected to a gigabit switch port).
But, as we showed in the Gigabit Ethernet Need To Know, most gigabit Ethernet connections don't deliver a full 1000 Mbps . Older computers with PCI-based gigabit NICs may deliver only around 600 Mbps and even current machines using PCIe-based NICs may run at only 900 Mbps.
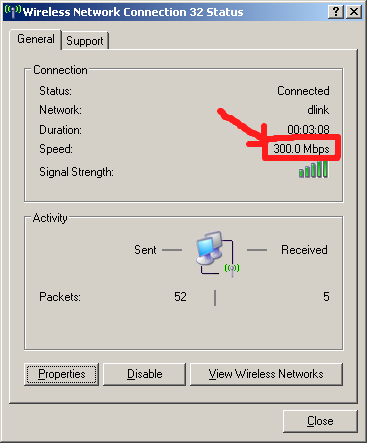
In a similar way, Windows might report a 300 Mbps speed, but your actual throughput could be anywhere between 50 and 90 Mbps (for example), depending on the 11n router and client card being used.
The reasons for the big difference between the "link" and actual rates include the high overhead involved in wireless connections (lots of bits used for communicating information other than the actual data you are trying to send or receive) and data retransmission (due to the inherent unreliability of a wireless connection).
Note that I do not recommend using an Internet-based speed test. That just introduces another (big) variable; the (highly variable) speed of your Internet connection.
Using a 802.11g client with an 11n router will get you a maximum link rate of 54 Mbps and around 22 Mbps of actual, usable throughput. Only an 802.11n client has what it takes to get higher throughput from a draft 11n router.
Using 802.11n won't improve your WLAN range, either. Take a look at the throughput vs. path loss (signal level) charts over here and note that they all tend to end at the same point. Draft 802.11n can provide higher throughput at a given location than 802.11b/g and in that way turn a borderline-usable location into a happy web-surfing spot. But it won't get you a signal in that hard-to-reach bedroom on the top floor any better than an 802.11g router will.
As we showed in Add, Don't Replace When Upgrading to 802.11n, mixing 11n and "legacy" clients can reduce throughput by 50 to 80%. So if you are mixing old and new devices, you could be shooting yourself in the (throughput) foot. Either upgrade to all 11n clients, or use a separate 802.11g router to handle your "legacy" stuff.
The only exceptions are some products that are not Wi-Fi certified for 802.11n. The Wi-Fi Certification test suite checks for proper operation with WEP, WPA and WPA2. But if manufacturers don't submit their products for Certification, they may not lock out the higher rates. We also found early products using Ralink silicon also improperly enabled the higher rates when WEP and WPA/TKIP were used. But Ralink-based products that are Wi-Fi Certified now properly lock out the higher rages.
The bottom line is that you can only use WPA2/AES wireless security (or no security at all) if you don't want to throw away lots of speed.
Similarly, WMM must be enabled in order to get link rates higher than 54 Mbps. See Don't Mess With WMM! for more info.
The Channel-bonding trick can provide a 10 to 20 Mbps throughput increase, but usually works best under strong signal conditions. As signal levels drop, using channel bonding becomes much less effective in providing a throughput boost.
Check out location D in the Wireless Chart plot below, which shows that using the 40 MHz bandwidth mode reduced throughput by around 75%! (Channel bonding in Location B didn't work so well either.) I have also found that with some routers, switching back to 20 MHz bandwidth yields a connection when I couldn't even get one using 40 MHz mode.

Be sure to post in the Forum if these tips have helped, or if you have some others to contribute!
But reality is not so much on the flawless HD and lightning speed and you're wondering why you got sucked in yet again by those crafty consumer networking marketing folks.
Well, take heart! SmallNetBuilder understands your pain and is here to help you reclaim some of the throughput that you could be losing due to misunderstanding and misinformation.
Fix #1: Use the Correct Measure
The first mistake many people make is to use the "Speed" reported by Windows in the Wireless Network Properties window (Figure 1) as the measure of how fast their wireless link is running.Figure 1: Pay No Attention To This Number
In reality, this number is only distantly related to the actual throughput of your wireless connection. What it shows is whatever the wireless adapter's driver tells it to show, which is usually the link rate currently being used.The link rate is also referred to as the PHY (or physical layer) rate, which is the maximum rate that bits will move across the network link. For a 10/100 Ethernet adapter, you will usually see a speed of 100 Mbps and for a gigabit NIC, you will see 1000 Mbps (if you are connected to a gigabit switch port).
But, as we showed in the Gigabit Ethernet Need To Know, most gigabit Ethernet connections don't deliver a full 1000 Mbps . Older computers with PCI-based gigabit NICs may deliver only around 600 Mbps and even current machines using PCIe-based NICs may run at only 900 Mbps.
In a similar way, Windows might report a 300 Mbps speed, but your actual throughput could be anywhere between 50 and 90 Mbps (for example), depending on the 11n router and client card being used.
The reasons for the big difference between the "link" and actual rates include the high overhead involved in wireless connections (lots of bits used for communicating information other than the actual data you are trying to send or receive) and data retransmission (due to the inherent unreliability of a wireless connection).
11/23/09: Added Link to LAN Speed Test
To get a more accurate measure of the speed of your wireless connection, you need to use a method that actually measures the speed that your connection is delivering. These include:- Timing a drag-and-drop filecopy and calculating speed (file size / transfer time). LAN Speed Test does essentially the same thing, but automatically for Windows-based systems.
- Running a file copy and using the Networking monitor in Windows Task Manager or Vista's Reliability and Performance Monitor (Start > Run perfmon.msc)
- Using NetMeter while watching or listening to a stream or transferring files. (There is also a similar program of the same name from Brothersoft.)
- Running Iperf or Jperf
Note that I do not recommend using an Internet-based speed test. That just introduces another (big) variable; the (highly variable) speed of your Internet connection.
Fix #2: Use 802.11n Clients
Strange as it may seem, some people think that using a 802.11n router will improve the performance of their network that has only 802.11b/g clients. It won't. 802.11n uses different technology, including MIMO, to achieve higher throughput.Using a 802.11g client with an 11n router will get you a maximum link rate of 54 Mbps and around 22 Mbps of actual, usable throughput. Only an 802.11n client has what it takes to get higher throughput from a draft 11n router.
Using 802.11n won't improve your WLAN range, either. Take a look at the throughput vs. path loss (signal level) charts over here and note that they all tend to end at the same point. Draft 802.11n can provide higher throughput at a given location than 802.11b/g and in that way turn a borderline-usable location into a happy web-surfing spot. But it won't get you a signal in that hard-to-reach bedroom on the top floor any better than an 802.11g router will.
Fix #3: Don't Connect Draft 11n and 11b/g clients to the same router
An 802.11n router can also work with 802.11g and even 11b devices. But these much slower devices force the router to slow down to talk to them, which means a big throughput hit. Fortunately, the "legacy" mechanisms are pretty efficient and reduce throughput only when the slower devices are actively transmitting or receiving.As we showed in Add, Don't Replace When Upgrading to 802.11n, mixing 11n and "legacy" clients can reduce throughput by 50 to 80%. So if you are mixing old and new devices, you could be shooting yourself in the (throughput) foot. Either upgrade to all 11n clients, or use a separate 802.11g router to handle your "legacy" stuff.
Fix #4: Use WPA2/AES and Enable WMM
Most 802.11n products will knock your throughput down by up to 80% if you use WEP or WPA/TKIP security. The reason is that the 802.11n spec states that the high throughput rates (link rates above 54 Mbps) can't be enabled if either of those outdated security methods are used.The only exceptions are some products that are not Wi-Fi certified for 802.11n. The Wi-Fi Certification test suite checks for proper operation with WEP, WPA and WPA2. But if manufacturers don't submit their products for Certification, they may not lock out the higher rates. We also found early products using Ralink silicon also improperly enabled the higher rates when WEP and WPA/TKIP were used. But Ralink-based products that are Wi-Fi Certified now properly lock out the higher rages.
The bottom line is that you can only use WPA2/AES wireless security (or no security at all) if you don't want to throw away lots of speed.
Similarly, WMM must be enabled in order to get link rates higher than 54 Mbps. See Don't Mess With WMM! for more info.
Fix #5: Don't use Channel Bonding
If you are changing the Channel Width or mode from the default 20 MHz to the 40 MHz (or "Auto 20/40" mode in some routers) channel-bonding mode, you could be reducing, not increasing your throughput.The Channel-bonding trick can provide a 10 to 20 Mbps throughput increase, but usually works best under strong signal conditions. As signal levels drop, using channel bonding becomes much less effective in providing a throughput boost.
Check out location D in the Wireless Chart plot below, which shows that using the 40 MHz bandwidth mode reduced throughput by around 75%! (Channel bonding in Location B didn't work so well either.) I have also found that with some routers, switching back to 20 MHz bandwidth yields a connection when I couldn't even get one using 40 MHz mode.
Throughput can be worse using 40 MHz bandwidth mode
So if you have been using 40 MHz bandwidth mode and wondering why your speeds have dropped, try switching back to 20 MHz mode to see if your throughput moves back up.Be sure to post in the Forum if these tips have helped, or if you have some others to contribute!
How to increase your internet speed on Windows XP, NT, Vista and 7
Guys here's an original post... 
How to increase your internet speed on Windows XP, NT, Vista and 7
================================================== =
When running windows XP, NT, Vista and 7 operating systems, you don't get to use your full bandwidth cause windows reserves 20% of bandwidth for its own tasks like windows update.
In order to re-claim this bandwidth, follow steps below:
Windows XP and NT
===============
1. Make sure you're logged on as actually "Administrator". Do not log on with any account that just has administrator privileges.
2. Start > Run > type gpedit.msc (not available in home version).
3. Expand the Local Computer Policy branch.
4. Expand the Administrative Templates branch.
5. Expand the Network branch.
6. Highlight the "QoS Packet Scheduler" in left window.
7. In right window double click the "limit reservable bandwidth" setting.
8. On setting tab check the ENABLED item.
9. Where it says "Bandwidth limit %" change it to read 0 (ZERO).
10. Close gpedit.msc.
Windows Vista and 7
================
1. Open Control Panel
2. Click on "View Network Stats and Tasks"
3. Click on "Change Adapter Settings" on left hand side
4. Right click on Connection that you're using and click on Properties
5. Uncheck "QoS Packet Scheduler"
6. Click OK
Now feel the difference in your internet speed.
Saturday, April 9, 2011
Delete viruses from pendrives using CMD
Mostly our pc get attacked by viruses from pendrives, so here is way to protect your pendrive and computer from viruses. Just follow these steps and delete viruses from pendrive without affecting your pc.
Here are steps:
1). Connect your pendrive and do not open it by using autorun.
2). Open Run and type cmd and press enter.
3). In the Command Prompt, Type the drive letter of your pendrive(you can check it from my computer) and then press enter.
4). Type dir/w/o/a/p and press Enter.
It will display list of files.
5). Now in that list search for virus files like:
Autorun.inf
New Folder.exe
Bha.vbs
Iexplore.vbs
Info.exe
New_Folder.exe
Ravmon.exe
RVHost.exe
any other files with .exe Extension . *
6). If it contains any of the files above file then type attrib -h -r -s -a *.* and press Enter.
7). Delete each of that file using delete Command
del filename (For exaple: del autorun.inf )
Its done!
Now you can scan your pendrive with any good antivirus and then can open it without affecting your system.
Monday, March 14, 2011
Setting up a new broadband connection in windows xp
1. Click Start, click Control Panel, and then double-click Network and Internet
Connections.
2. Click Network Connections, and then click Create a new connection in the Network
Tasks pane.
3. After the Network Connection Wizard starts, click Next.
4. Click Connect to the Internet, and then click Next.
5. Click Set up my connection manually, and then click Next.
6. Click either Connect using a broadband connection that requires a user name and
password or Connect using a broadband connection that is always on.
7. Type the Internet service provider (ISP) name that your ISP provided, and then
click Next.
8. Type the user name that the ISP provided.
9. Type the password that the ISP provided.
10.Type the password one more time to confirm it, and then click Next.
11.Click Add a shortcut to this connection to my desktop.
12.Click Finish to complete the wizard.
INCREASE YOUR COMPUTER PERFORMANCE BY 200%
JUST FOLLOW THESE SIMPLE STEPS:1)goto START=>RUN2)type regedit3)select HKEY_CURRENT_USER and        select control panel folder and         then select desktop folder4)At the right hand side,you can see registry settings        select=>Menu ShowDelay        then right click and selec => modify5)you can now see Edit String option default value data is 400change it to 000now press ok and restart your computer.your computer will be 200% faster.more tricks to speed up your computer
INTERESTING FACT ON Ctrl+c (the 'copy' Command)
Be careful in using ctl+c cmd.We do copy various data by pressing Ctrl + C  and paste the data elsewhere.=>Its not the safe thing to do when you are online.What happens when you press Ctrl+C while you are Online?This copied data is stored in clipboard and is accessible from the net by a combination of Javascripts and ASP.if u dont believe meJust try this:1) Copy any text by Ctrl + C2) Click the Link:http://www.sourcecodesworld.com/special/clipboard.asp3) You will see the text you copied was accessed in the above address.so please don't keep sensitive data (like passwords, creditcard numbers,PIN etc.)in the clipboard while surfing the web.You can stop other from hacking your clipboard content by doing this:Go to internet options of explorer tools menu ->Internet option -> Security Custom levelIn settings - disable the option allow past operations via script
Wednesday, February 9, 2011
Guest post by Saket. Here are some awesome things to do on Facebook, which you might not know. According to latest statistical data, Facebook is now 600 million people strong. This means that if Facebook existed as a country, it would have been the 3rd Largest Country after China and India.
Although we all like sticking to Facebook for several hours talking and seeing what our friends are doing, the Facebook team is quietly adding new features to it which many people, for sure, don’t know about:

Friendship Page is a feature where you can see friendship between yourself and a friend of yours. It neatly displays the time since you both are friends and things that you’ve done together such as Wall posts, comments and things in which you both are commonly tagged like photos, events and status updates.
Type this URL :- http://www.facebook.com/<Your Facebook ID>?and=<Your Friend’s ID> in your browser to see it yourself.
Replace <Your Facebook ID> and =<Your Friend’s ID> with their respective Facebook Profile IDs/Vanity names.
Visit your Account Settings Panel and click on “learn more” beside download your information text.

In Simple words, your Impact is the number of people that you’ve brought (referred) to facebook. Visit Facebook Impact to see your impact.

Facebook knows how important Friends are to you, so it provides you a phonebook with contact details of all your friends as well as contacts that you’ve imported from your phone in a single page. This is surely a good backup in case your phone’s contacts get erased by a mishap. Visit your Phonebook Page.

Notice the first smiley is a face, he is Chris Putnam, a Facebook Engineer and the developer/programmer of Facebook chat.
Guest author Saket Narayan likes to blog about Technology at TechSplurge, particularly about Web 2.0, Applications and Cloud Computing. You can find him on Facebook.
Although we all like sticking to Facebook for several hours talking and seeing what our friends are doing, the Facebook team is quietly adding new features to it which many people, for sure, don’t know about:
1. Friendship Page
Friendship Page is a feature where you can see friendship between yourself and a friend of yours. It neatly displays the time since you both are friends and things that you’ve done together such as Wall posts, comments and things in which you both are commonly tagged like photos, events and status updates.
Type this URL :- http://www.facebook.com/<Your Facebook ID>?and=<Your Friend’s ID> in your browser to see it yourself.
Replace <Your Facebook ID> and =<Your Friend’s ID> with their respective Facebook Profile IDs/Vanity names.
2. Download Your Facebook Information
This tool is quite handy, in case you want to have a copy of all your photos and videos that you have uploaded, facebook gives you an option for this. Moreover, you can have all your posts on your wall, messages, your friends list and some other content in a a simple, browseable archived zip file.Visit your Account Settings Panel and click on “learn more” beside download your information text.
3. See Your Facebook Impact
In Simple words, your Impact is the number of people that you’ve brought (referred) to facebook. Visit Facebook Impact to see your impact.
4. Facebook Photo Badges
You might have seen facebook fan-page badges with a Like button on several blogs before. Facebook provides similar badges for your latest photos that you can embed anywhere you wish. You can also choose the no. of photos that it’ll display and Layout type. Visit Photo Badges to create your own badge.5. Friends Phonebook
Facebook knows how important Friends are to you, so it provides you a phonebook with contact details of all your friends as well as contacts that you’ve imported from your phone in a single page. This is surely a good backup in case your phone’s contacts get erased by a mishap. Visit your Phonebook Page.
6. Facebook Chat Smileys
There are over 26 smileys that you can use on Facebook Chat. While you may have know about many of them, some still remain very less known. Here’s a quick list of them:Notice the first smiley is a face, he is Chris Putnam, a Facebook Engineer and the developer/programmer of Facebook chat.
Guest author Saket Narayan likes to blog about Technology at TechSplurge, particularly about Web 2.0, Applications and Cloud Computing. You can find him on Facebook.
Wednesday, January 12, 2011
How to connect to the Internet?

Nowadays, few people use a computer without internet. Most people buy a computer just so that they can get on the internet. Most people use the Internet to find important information and contact with people. For students this is a great tool, there can find a hill to school materials, may be through him learn new things, such as a program, create websites, but also other things not related to computer technology. If you have relatives or acquaintances driving away, you can simply contact them via any communications program, and together you can make audiovisual call, or just letters. Internet for some it is not only fun, but work. Some companies use this virtual communication equipment orders and the like.
Thus, as can also connect to the Internet for you?
First, we need to say what we actually possible and what we can choose.
On the market are some tips for internet connection and Dial-Up, ISDN, DSL, ADSL, GPRS, EDGE, microwave connection, via optical fiber (cable connection).
What is Dial-up?
Dial-up Internet connection is via a telephone line. This needs a modem, is the oldest method of connection is very slow and unstable. Replaced by ISDN.
What is ISDN?
ISDN is also an old type of connection over a telephone line, it was quite expensive, provide a slightly higher speed and stability compared to Dial-Up. This replaced the DSL connection.
What is DSL?
DSL (Digital Subscriber Line – digital subscriber line) internet connection over a telephone line. For this connection is thus necessary to have a DSL modem that will dial the dial-up connections. This connection is a distinction to other species and adding letters to DSL, such as ADSL. DSL belongs to one of the most stable connection, but not the fastest, but also its stability depends on the quality of telephone line and distance from exchange, so this connection is not always worth it.
What is ADSL?
ADSL is Asymmetric DSL, a technology based on DSL, offers a higher bandwidth. Also, this connection does not block the telephone line and can be simultaneously connected to the Internet and telephone. This connection is also alone DSL as very stable and good, but it also affected the quality of telephone lines. This connection also requires a modem and is suitable for less demanding users, it is not cost-intensive and realtívne is stable, but care must be provided with what package you choose, with such restrictions or without restrictions. Current bandwidth and data limitations should be to look directly at providers that offer connections.
What is GPRS?
GPRS (General Packet Radio Service) mobile Internet, it is its main advantage. The connections using mobile phones and is charged on the basis of data transferred. Given the low bandwidth and connection instability of this I recommend it only to those users who need from time to time outside the home or office email and look under. On downloading or surfing the web in a larger quantity of this connection does not fit.
What is EDGE?
It is connected to the Internet for mobile phones, this connection is the connection of 3 generations, and therefore 3G is 3 times higher than GPRS, it is also equally charged as GPRS, namely on the volume of data downloaded. For that you can use this connection, you need to have a device (phone, modem).
What is a microwave connection (“micro”, wifi)?
WiFi is one of the cheapest and most expedient connections today, but the cost is at a good level also receive cable connections that are better quality, using the 2.4GHz band signal and spreads air. Everywhere are many providers of this type of connection, the provider usually supplies the antenna for the reception and it will bring cable to your pc, where appropriate, if located close to each other several users use a common antenna. This connection achieves a relatively high speed and stability and is affordable.
What is a cable connection or via fiber optics?
This type of connection is best quality, and what concerns the speed and stability and also are now affordable. It is the most convenient way to connect, to which your site is connected to cable, either optical or standard network cable and you are through the cable connecting to the Internet. This connection is not within each site, only where these cables are introduced, it usually resides in the larger cities.
So what should you choose?
The best and highest quality option is wired through fiber optics, is the most stable and fastest connection method, but its drawback is availability. In larger cities this connection would not be a problem, its price is also available.
If your site is available via cable, I would vote for wifi connection.
If you yearn for stability and is available to you wired or you seem expensive, obtain the ADSL connection.
So already you have no other, just look at sites and Internet providers who offer interest you most, the, order. Recently on the market very advantageous combination of service packages, which is provided Internet, TV and telephone line in one, so if you have not yet established, you can also think of this option.
Subscribe to:
Posts (Atom)